Pages

Showing posts with label Do-it-yourself. Show all posts

Saturday, November 3, 2012

Under $10 State Nail & String Art

Is there anything better than decorating your walls with original pieces of art that show off your personality? I don't think so. Today's DIY on a dime is all about creating a piece of wall art that will do just that, but without breaking your bank.
California Love // Reclaimed Wood Nail and String Art Tribute to The Golden State

While checking out Etsy's new holiday gifts, I came across this beautiful piece of art. Eleanor Mathis, the shop's owner, hand makes each of these nail and string tributes on reclaimed Mississippi wood. The quality of her work is worth the $110 price tag, but I see a DIY opportunity that would cost much less.

California State Nail & String Art

Supplies Needed:
Wood Plaque= $2.99 (Michael's has a great selection of wood plaques in a variety of sizes)
Nails 1 in. long= $1.30
Thread Spool= $1.49
Acrylic Paint= $1.49
Foam Brush= $0.98
Total Cost= $8.25

Gather supplies and get started!

1. Print out the template I created from here.
2. Grab the sponge brush and paint the wood plaque with color of your choice.

 3. Once the paint has dried, tape the state template down onto the plaque.

4. Hammer the nails into the wood following the lines on the template.

*Tip: Start by placing nails in the corners of the state. This will allow you to decide how far apart you'd like the nails to be on the template.
 *Tip: Don't forget to outline the heart first! It will become difficult to hold the nails where you'd like them to be hammered in if the state outline is already done.
 5. Hammer nails all around the template until the state is completely outlined.
 6. Tear off the paper.
 7. Tie a knot with the thread around the nail you'd like to start with. I began at the upper left corner of the state.
 8. Weave the thread around the nails outlining the state connecting it with the opposite nail outlining the heart.
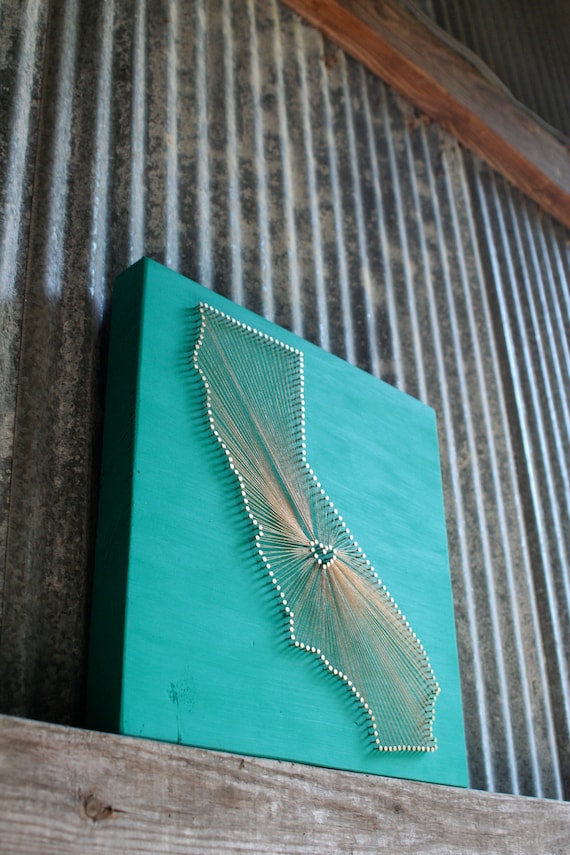
Ta-Dah! Now show off your state pride in style!


Sunday, October 28, 2012

Under $10 Lampshade Makeover

Once I finally decided on which colors I would decorate my apartment with, I went on a hunt for the perfect table lamp and lamp shade to compliment the shades of grey and deep purple. I headed to Target (where else?) and fell in love with a vintage inspired rounded orb table table lamp that looks a little something like this lamp, but for half the price. Apparently I purchased one of the last ones because I can't seem to locate the acrylic version online.

Buying a $30 lamp is a bit of a spurge for me so I chose this simple white empire lampshade and walked to the check out line as fast as I could before I saw any thing else I wanted. Self-control is always a necessary characteristic to exercise when shopping at Target.

I enjoyed the simple look that my table lamp and lamp shade combination provided, but I soon grew bored of it just like everything else and craved a change. Inspiration struck when I encountered a pretty lace ribbon at Michael's and I decided to see how I could makeover my white lampshade.

Supplies needed:
Lace Ribbon= $4.97
Spray Paint= $3.99
Tape (had on hand)
Lampshade (had on hand)
Total= $8.96

Gather supplies and get started!

1. I recommend doing this project outside because spray paint has a tendency to get everywhere.

2. Arrange the lace on the lampshade so that it lays flat and tape down.

*Tip: To achieve the desired affect, arrange lace and spray paint on only one side of the lamp shade at a time.

3. Spray paint evenly on one side.


4. Continue to move lace around the lamp shade, spraying one side at a time until the lamp shade is completely painted.

5. Let paint dry.

6. Once dry, place lamp shade on lamp stand and turn the light on!

This DIY only takes about ten minutes to complete making it one of the fastest and most favorite of mine!

Sunday, October 21, 2012

Upcycled Halloween Decor

Did you know there are only 10 more days left until Halloween? I don't know about you, but October has certainly flown by for me. I feel like it was just yesterday that I was walking into Michaels and they were putting out the Halloween decorations. That was around August 31 right? I'm kidding, but seriously, stores start selling holiday decor too far in advance, if you ask me.

Those artfully decorated end-of-aisle displays always catch my eye. I end up rationalizing a gorgeous wreath to put on my front door or a couple little trinkets that will clutter up my dresser and I'll end up giving them to my mom for a garage sale because they're not cute outside the store. I have a problem.

So this year I have decided to upcycle my decorations. I stumbled upon this awesome blog called Upcycle That and it honestly changed the way I look at products I use on a daily basis. For example, I started to imagine a candy corn decoration out of a glass coke bottle and a wine bottle by adding a couple coats of paint.

Upcycling: “It’s taking something that you would otherwise throw out and finding a way to make it into something else.” -Upcycle That

Upcycle That posted about a couple upcycled Halloween decorations. My favorite is the Ghost Jug, which originally was posted on the Disney Family Fun blog.
So after fantasizing about upcycling every little thing I was about to throw away (a person could really become a hoarder with that mindset), I decided to put my money where my mouth is and upcycle already!

Candy Corn Bottles and a Jack-o-Lantern Milk Jug
Supplies Needed:
1 Glass Coca-Cola Bottles= $2.19
1 Wine Bottle= $1.99 (Yes I like to drink Charles Shaw wine or you might refer to it more affectionately as "Two-Buck Chuck")
3 Different Colors of Acrylic Paint= $4.47
1 Sponge Brush Set = $1.79
1 Gallon of Milk= $3.49
1 Glow Stick= $0.75
Total Cost= $14.68


Gather the supplies and get started!


1. Start by painting the top of the bottles white. Several coats of white may be necessary.


2. I prefer to mix my own colors so I blended equal parts of red, yellow and white paint to create the orange color I wanted.

3. Paint a line around the bottom of the neck with orange. The orange painted portion should cover the largest surface area of the bottle so it looks similar to the candy.


4. Paint the remaining part of the bottle yellow.
 5. Let paint dry.

 6. While you're waiting for the Candy Corn bottles to dry, you can make your Milk Jug Jack-o-Lantern.


7. Cut a a square out of the back of the milk jug. This opening is where you will place your glow sticks.

8. Use a black pen to draw the face of your jack-o-lantern on the opposite side of the milk jug.
 

9. Place glow sticks in the back of your Milk Jug Jack-o-Lantern and turn the lights out to enjoy!


After these two simple upcycles I'm now a huge fan of upcycling every day products!

Friday, October 5, 2012

Under $15 DIY Statement Necklace

Statement necklaces are trending right now. They're on every model in fashion magazines, celebrities are wearing them, and you can't stop thinking how great your simple black shirt would look with a statement necklace of your own. I, personally, can't spend almost $500 on a necklace like this sparkly Judith Jack Necklace from Nordstrom's to satisfy my statement necklace craving.

During one of my late night Pinterest binges I came across this gem:


This necklace was exactly what I was envisioning, complete with lots of color and eye-catching qualities.

Where does the pin's link take me? To a tutorial on how to make your very own necklace on Made by Girl.

Unfortunately, she had no idea the source of the photo I was drooling over and after spending about an hour attempting to locate the source myself I gave up.

One of Made by Girl's bloggers, Jenny May, takes you through each step, all of which are simple and absolutely do-able for a beginner jewelry maker.

I decided to attempt the necklace myself but by spending much less than May says she spent on just the pendants ($25!). I headed over to Ruby Bead Co. on the corner of 4th and Ximeno in Long Beach and stocked up.


Supplies Needed:
5 Crystal Teardrop Pendants (1 large, 2 medium and 2 small) = $5.35
Gold tone jewelry chain (about 15 in.) = $3.99
5 Gold tone "jump rings" (One for each pendant) = $1.99
1 Gold tone jewelry clasp = $1.00
5 different nail polish colors (I already own my fair share of nail polish but Walmart has great colors for only $1 each) = $5
Total Cost= $12.33 (if you already own nail polish) or $17.33 (if you had to purchase polish)

Gather the supplies and get started!
1. Test different color combinations on a piece of paper.

2. Paint one side of each pendant with the polish colors you decided. The middle pendent should be the largest in the line up.

3. Several coats of polish are necessary. Let dry. 

4. Measure chain against a necklace of desired length.
5. Enlist pilers to fasten jump rings to the necklace chain placing each an inch a part on the chain.

6. Fasten each end of the clasp to each end of the chain.

7. Congratulations! Your necklace is now ready to style that plain black shirt!